Monday, July 11, 2016

Working in a Series - Buoys

I recently completed an online course taught by Elizabeth Barton called Working in a Series.  The course is offered through the Academy of Quilting.  The course is excellent and I've never experienced an on-line quilting teacher as thorough or as encouraging as Elizabeth.  This is the third class I've taken from her. Previous classes were Inspired to Design (I took this one twice), Basic Dyeing for Quiltmakers, and Abstract Art for Quiltermakers (I audited this).  All her courses are excellent.

Back to Working in a Series.  This class involves selecting a single theme and making a series of quilts on that theme.  My theme was buoys.  I am interested in the various shapes, angles, patterning that one might find when buoys are all piled up in a jumble. I had made a piece featuring buoys in the Inspired to Design class and wanted to explore it more.

First we made sketches.


Then I rendered some of my sketches in water color  and some in acrylics before I even selected fabric.  I found doing so helped me quickly determine where value problems might occur . (Yes, I have done value studies with light, medium, and dark pencils and those work well. But I found that often when working with color, one doesn't realize how tricky values and temperature can be.)  The color sketches also made "trouble shooting" easy.  I could post my piece on the classroom forum and Elizabeth was able to critique it and make suggestions. Thus corrections or changes were easily incorporated without the struggle of having to take apart a fabric piece.
Here is an example:
acrylic sketch with chalk marks

After seeing this sketch (without the chalk marks), Elizabeth pointed out that the orange buoy in the middle is too large and also the wrong color.  The warmer orange pushes forward against the light yellows.  I had wanted that buoy to be in the back ground. She also suggested that the background space needed to be a bit more obvious.

I drew possible changes with chalk on the painting and after a couple more discussions with Elizabeth via the forum I came up with a solution that worked and I made up with fabric. (see below)


Buoys #1 (approximately 18"x18")
The stripes on the large buoy were made by sewing a lot of small pieces of fabric together to get the shading and variations of color, which is not as apparent in the other four buoys.  By selecting cooler colors and aligning the buoys in different angles I was able to get the back buoys to recede .  The pieces are all raw-edge appliqued with a small blanket stitch, sewn on to a muslin foundation.


The next two of the series are presented below-  sketch first, then the fabric rendition.
sketch Buoys 2


Buoys #2  (18" x 24")


sketch Buoys #3


Buoys #3 (17" x17")


I hope in the course of the year I will complete the next three of the series AND quilt all six of them.  But, don't hold your breath!  I have a wedding quilt to make in the meantime!

Sunday, July 3, 2016

We have a WINNER!

Thanks to all who commented on my two recent barn posts.  A signed copy of Build A Barn will be going to  Carol E. whose name my husband pulled out of the box.  

Stay tuned to the SSOBB Blog Hop for more fun and info.  Next up will be Heidi.  Look for her post on Monday, July 4.

Thursday, June 30, 2016

Some More Barns

A tiny Barn

Last Christmas, several of the SSOBB members participated in a Secret Santa swap among ourselves. The gift I gave was a box filled with scraps, which usually brings the recipient bits of fabric she doesn't have in her stash anyway. Once I started poking through my scraps the urge to make something with them surfaced. I wanted to include it in the box. I didn't have a lot of time so I limited myself to what I could make in one evening. I was thinking of a mug rug, but this, being an SSOBB exchange, I decided it had to feature a barn.
I was thinking of the old dilapidated barns that stand forlornly in fields. The paint is pretty  much gone and maybe there are gaps in the siding. The roof bows and the barn tilts.  I chose not to include a door. It is somewhere on a side you cannot see and is probably wide open.

Note that the roof was made in a non-conventional manner. I pieced small scraps arranged vertically into a strip. I  made the strip long enough to overhang the walls and simply attached the sky pieces at either end at an angle and trimmed it to the width of the strip.   

6..5" x 7"


A Concocted Barn
Sometimes while free piecing, the end result does not resemble the inspiration or even what I had imagined it would look like. That's what happened with this next barn.

My inspiration was a barn I saw near Brooks, Maine. I liked the salt-box construction with the long sloping roof and also the multi directions of the siding boards.  I also liked the long row of windows in the short wall.


 Did I capture it?... Nope.  Part of the problem is that I was trying to get the two point perspective on a rather small piece of paper and I chose a  different spot for the horizon (my eye level) than that in the photo. Consequently, I drew a compacted sketch. Furthermore, I completely forgot about the wonderful siding pattern, the little window, and the overall size of the barn.

As I have said before, sketches act as a map. They work well if one consults them.  Only, in this case, I didn't.  Don't ask, "why not?", 'cause I don't know the answer.  Just one of those things that happened. The windows and door are bigger than they should have been. I suppose I could have made the barn bigger, but it didn't grow as expected - maybe I was running out of fabric, though I doubt it. Most likely, I was feeling bamboozled by the angles I did create when I cut my fabric. Some of them were downright screwy.  I re-cut some, and made a few adjustments, but still felt frustrated.


The work hung on my design wall for weeks and then one day I decided just to keep going and not be so particular about it.  After all, what I had created could have been a barn... a log barn, with a big faded door and a row of screened windows.  Barns (real or make-believe) have character. That's what one makes them so interesting.  And, free-piecing is sure to capture that when you let it.
Approx. 15" x 14"


Be sure to leave a comment for a chance to win a signed copy of Julie's book.  Don't be shy.  Free-piecing opens a whole new world in quilting and Julie will hold your hand the whole way.  The drawing will happen on Saturday night,  JULY 2.

The SSOBB Blog Hop is not done, yet.  Heidi from Germany will be telling you about her barn, beginning July 4.  (libellenquilts.blogspot.com)

P.S.  I also made a Stone Barn... but blogged about it recently so I won't repeat it.  Click on the link to read about it.


Monday, June 27, 2016

A City Barn in Maine - SSOBB blog hop

 Once upon a time  Julie Sefton was writing a book and needed to have the drafts read and tested. She recruited quilters with varying experience as guinea pigs.  To make the job more special, Julie created the Secret Society of Barn Builders  (SSOBB) an elite sorority of which we were charter members. We could email between ourselves and her, but we were to be mum to the rest of the world. Can 15 people keep a secret about an exciting project?   We sure did, even though we were busting to share.  When her book, Build-A-Barn No Pattern Construction, was published this past April, we were finally able to spill the beans.  Now it is my turn to tell you about the barn I made - a city barn in Maine.

When Julie contacted me to be on the team of testers for her free-pieced barn building project,  I was very excited.  I love free piecing and the inherent character that results from quirks when sewing without a template or precise measurements.   I have made many quilts with free pieced houses on them, but not a barn, so this was new focus for me.

Julie gave us few directions: "Create a free pieced barn that reflects the area where you live using the book's process note drafts for reference, fabrics already in your stash, and your own design sensibilities and skill sets."  She also asked that our piece measure around 24 - 26 inches.  That dimension was the challenge for me.  All my house pieces were much smaller.

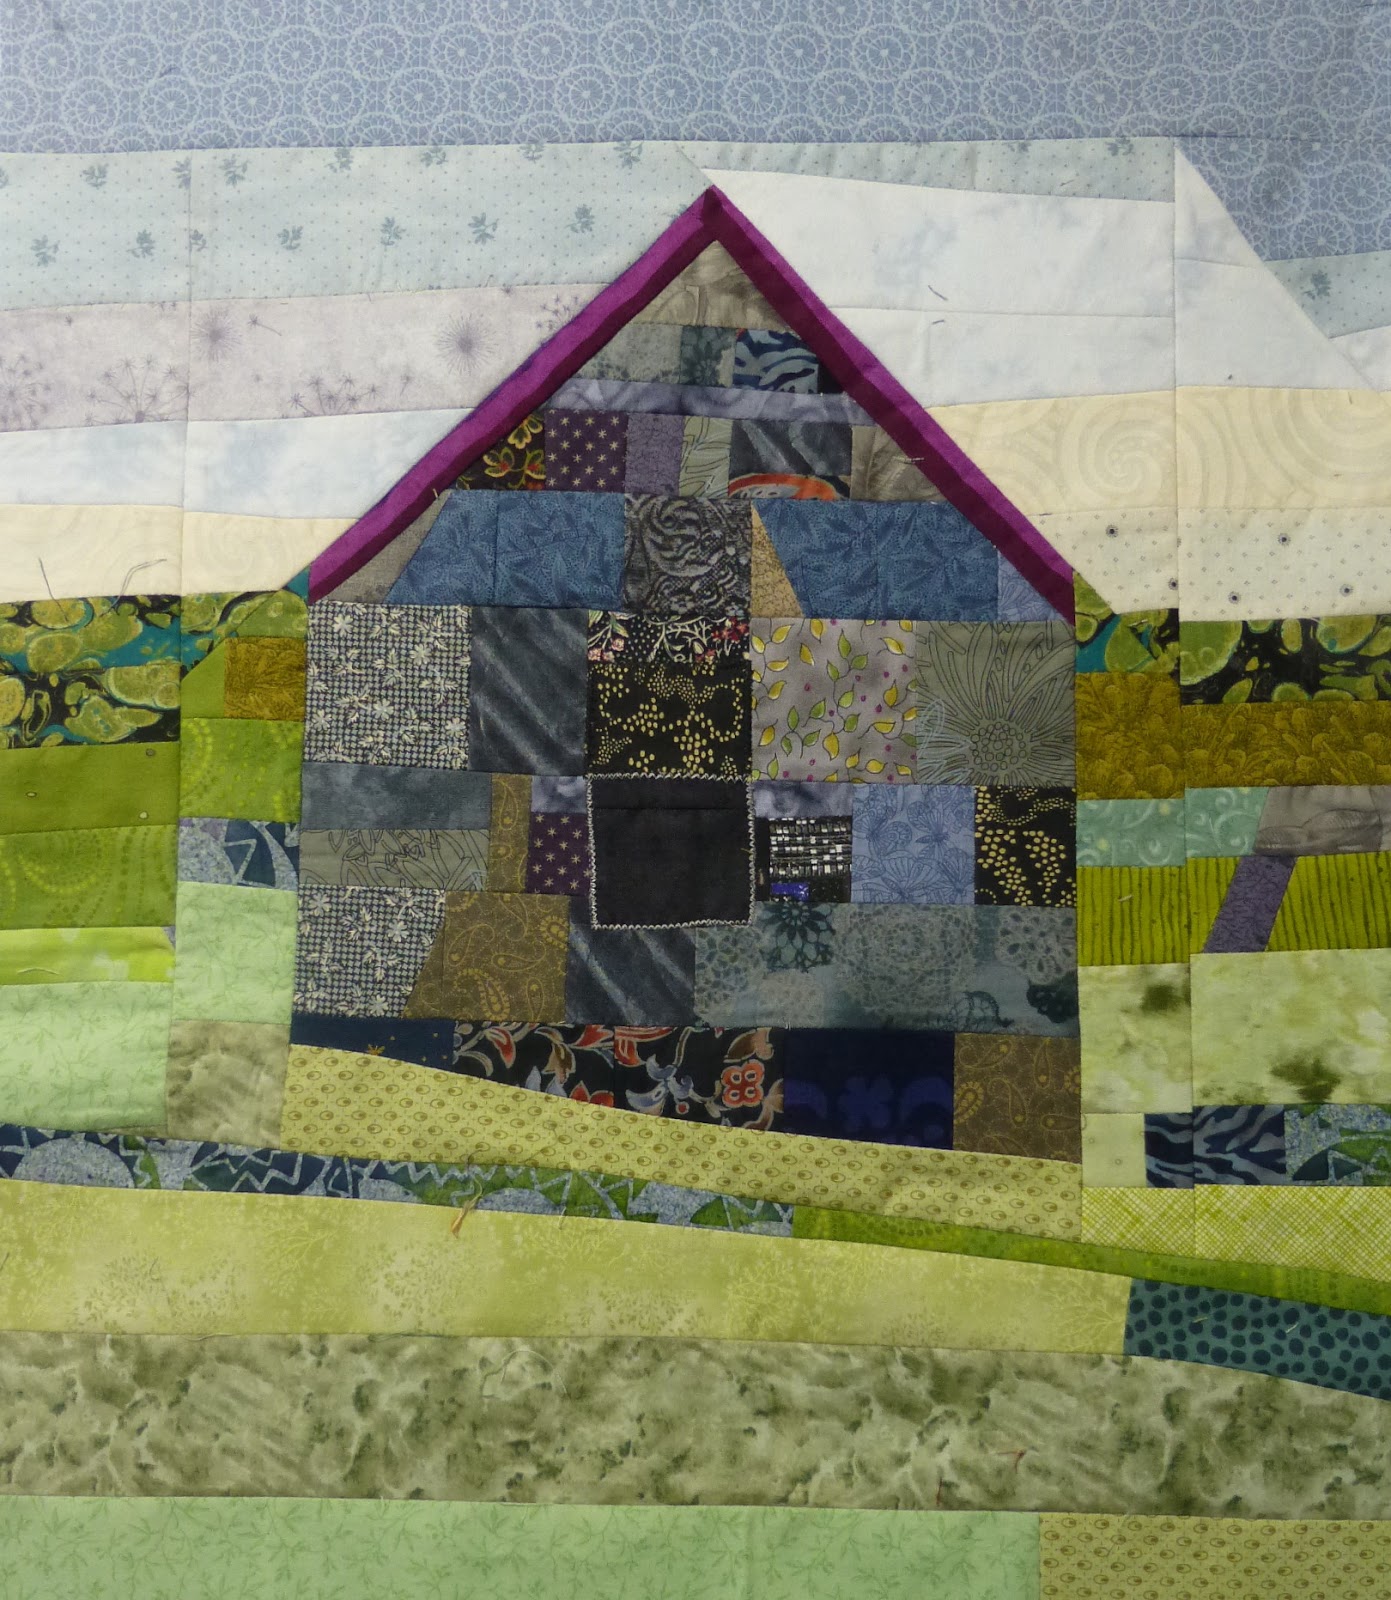
I chose to depict the barn that is attached to my home. In the coastal town of Belfast, Maine, nearly every home that was built in the mid to late 1800s has an attached barn. It doesn't matter if the home was a sea captain's mansion or a humble worker's house,  it will have a barn. These homes and barns are in town, not in the country.  Friends have referred to the barns as city barns.  Some barns are large, but none are gigantic.  Ours is big enough for a horse or two and a wagon or work supplies. The floor of our  barn is well trampled, with dented wide boards.  The hay mow clearly was used for storage.


( Our lot is narrow. I had to go to a window of the building next door to get this photo, hence the strange angle.)


I divided my sketch vertically and horizontally to identify sections that would be easy to piece together.  This was my map  throughout the process. It helped me to see what shapes I needed to cut and also reminded me of important steps like connecting background and the side of the building before raising the roof, especially if an overhang is needed.  The actual quilt piece did not turn out looking exactly like this, as I made changes as I went along.


When I sew buildings, I usually begin with windows. This allows me to set the scale of the rest of the building.
Barn window, Barn doors, hay mow door


As you can see the barn and house have clapboard siding. I really wanted the texture of clapboard, especially on the barn.  I sewed together narrow strips of alternating fabric to achieve that effect.   I sewed all these strips to make a large unit and then cut the sections I needed for the barn from it.   I used a subtle stripe for the siding of the house. I wanted the barn to stand out, not the house.
the masking tape marks the potential boundary of the piece


barn and attached house (or is it the other way around?!)


Finished piece - waiting for quilting by Chris Ballard

I used a bit of artistic license.  We live on a hill overlooking the harbor.  Our  real view is at the other end of the house. The above would be our view if our neighbor's building weren't in the way.

Although I titled this blog-post "A City Barn in Maine", the title of the piece is "just-Spring" after e e cummings' poem "in Just-".  When I made it I was thinking Spring, especially mud season.  That truly is a season in Maine which I feel should be celebrated rather than dreaded.  Winter has lost it's icy grip, buds are swelling and of course the world is "mud-luscious" and "puddle wonderful."  Windows and doors are open whenever it is warm enough, neighbors re-appear from indoor hibernation, and birds readily announce their presence. This train of thought was what prompted the choices of the fabric strips of the ground.

Julie provided each of us with sneak peeks of our finished quilts once Chris Ballard worked her quilting magic.  But, we still have to be VERY patient and wait to see them for real.  They will come home sometime towards the end of the year.  In the meantime, YOU might be so lucky to see them in a special exhibit featuring the BUILD-A-BARN gallery, at AQS Chattanooga (September 14 -17, 2016), AQS Des Moines (October 5 - 8, 2016  ) or at the Davies Manor Quilt Show in Memphis (November 4 - 6, 2016).


Ah yes, the book.  Julie wrote one incredibly readable book! She provides the back story on her prize winning quilt "See Rock City", which led to AQS's proposal that she put it all in type and photos .  But that's not all.  This is a book with excellent directions on how to deal with no pattern construction.

YES, YOU CAN DO IT, TOO!  Some lucky commenter will win a signed copy of Julie's book, BUILD-A-BARN, No Pattern Construction.  Leave a comment on this or my next posting. I will select via random drawing on Saturday, JULY 2.  Be sure you are a reply commenter (or provide your email address) so that I can contact you if you win.  (No-reply comments will be disregarded.)

Saturday, June 11, 2016

The Stone Barn

In North Wales, one would have to be blind not to see that stone is the primary building material available for just about anything... homes, churches, schools, walls. This is a rugged, mountainous country with few trees. Stones are available and that is what builders use.


So why not do the same when free-piecing a barn?  My most readily available material is scrap fabric. Yes, I do have fat quarters and some half yards, but those aren't cut.  My scraps are already variously cut. Most are sorted by color. Given that most of my scraps are small, less than 2 inches square,  I was limited in the type of barn I could effectively build.  This photo, taken near Llanegryn, North Wales, gave me all the inspiration I needed to dig into my scrap boxes.


I set the scraps aside while I worked on another project. Once that was done, I cobbled strips of scraps together to make the building. Then decided the rest of the quilt needed to be cobbled with strips of strips!  


This barn building project took several attempts where I had to look and troubleshoot.  That was the fun part and the most rewarding!  Let me explain.

Problem #1.  After I had sewn all of the scraps for the building together, I realized that the combination of dark fabric I chose for the window was too chaotic and also too large.  I wasn't going to pick out all the stitches to get to the middle pieces of three rows. So I raw edge appliqued a square of black fabric with light gray zigzag stitches so that it would stand out clearly.

Problem #2. The scrap pieces above the window looked too bulky to have been reasonably used as "building material". After all, who would want to heft a stone as big as a window opening up to higher levels. These barns were made manually, not with hydraulic lifts!  Once again, raw edge applique to the rescue.  You can see the "patched stones" in the following photo.


This shows that there is more than one way to solve the problems. One need not stick to methods or "rules".  One can un-sew and re-sew, but in this case, that was not practical.   I quote Gwen Marston, from her book Liberated Quiltmaking (1996),  "The most important solution to remember as you build your houses is learn by doing.  Figuring things out as you work keeps your interest high and makes the building process fun. Once you get going, you will be surprised at how ideas come to you with solutions for every pesky problem."  This is what I love about free piecing.  The results don't have to be perfect. The process demands imagination from the maker. It also engages the imagination of those who see the quilt and recognize the resultant character it holds.


Saturday, April 30, 2016

A Barn - built to last

One month ago I had the pleasure of exploring parts of North Wales with my son, his fiancee, and my husband.  We stayed in the village of Llanegryn.  Almost all buildings there are very solidly built, made with thick walls of stone.

As one of the members of the SSOBB - the Secret Society of Barn Builders, only we are no longer a "secret"- this abandoned house and barn caught my eye.


Just thought I'd share as these photos as the barns are different from those one sees in New England, USA.


From Wales, we went to the Lake District in the North of England. There stone barns are also prominent, but the stone is smaller than that used in Wales.


Of course, everywhere we went were paddocks of sheep and little lambs.


Julie Sefton's book, Build -A- Barn: No Pattern Construction, is now published. It is a terrific guide to free-piecing buildings.   I just might expand my quilting horizons by building a stone barn!

By the way, there is a Blog Hop going on now.  Check it out and see the many different barns that were created by the SSOBB.   Free piecing?  YES!  You can do it!

Sunday, March 13, 2016

She's been too quiet ...

As with a small child, quiet usually translates as busy - good busy or otherwise.  That's exactly how I have been since my last post.  Blogging falls by the wayside as the day comes to an end and all I want to do is relax and sleep.  So today I decided I'd just do it and check one more thing off my list.

Here's the quilting related list and some photos:

** Teaching at the local fabric/art shop, Fiddlehead Artisan Supply - five different classes.
- Introduction to Quilting - a four week class - Done.  Another session is in the works for mid April.

- Planning and "practicing" for teaching a class about using the Quick Curve Ruler (a Sew Kind of Wonderful notion). Here are the quilts/ tops I have made for this project. The title of the patterns are in parentheses)
From a free pattern ("Fun Poinsettia") on the Sew Kind of Wonderful web page:
This version follows the free pattern instructions. It  has been made into a pillow cover.  Hand quilted.

These two versions are also made from the above pattern, but I played "what if?" to see how the pattern changes.


Double Wedding Rings ("Metro Rings") - using solid colors and white on black and black on white fabrics to make the bits in the ring.  I chose the gray background to highlight rings that were made with black on white. The white background goes with those made with white on black.


("Deco Shimmer")
A variety of fabric was used because I didn't have enough of any one color/fabric to complete the pattern as directed.
Strings of Beads ("Urban Chained")
Again, limited background fabric, hence the stripes.


- Planning for teaching three liberated classes: Stars, Houses, and Windmills. I have photo-samples of the first two topics, but my windmill pieces are hanging in the store and I don't have a photo.

the smallest star in this galaxy measures 1 inch.


** Digging into my stash and making a little dent with Slashed Squares - influenced by Lynne Tyler's recent projects:  (She provided a tutorial)
From this:
and this
  
to this


** Making a baby quilt for my niece's little one. I made an amish style quilt for the parents' wedding. It made sense to do likewise for the baby. I make small baby quilts, which can graduate in time to being a doll or teddy bear quilt. This one is 24" x 32",  A little bit bigger than I usually make.


** Planning three I Spy quilts for slightly older nephews and nieces.  I have all the patches, just haven't put them on the design wall to see what lay out I want.

** Making  mug rugs for two very special people whom I will see very soon.


** Keeping a BIG Secret, which can now be whispered about.... SSOBB. The Secret Society of Barn Builders!  See the link on my sidebar.

It may be a little while before I post again, but I will try to be more timely.