I made a BIG quilt from blocks of
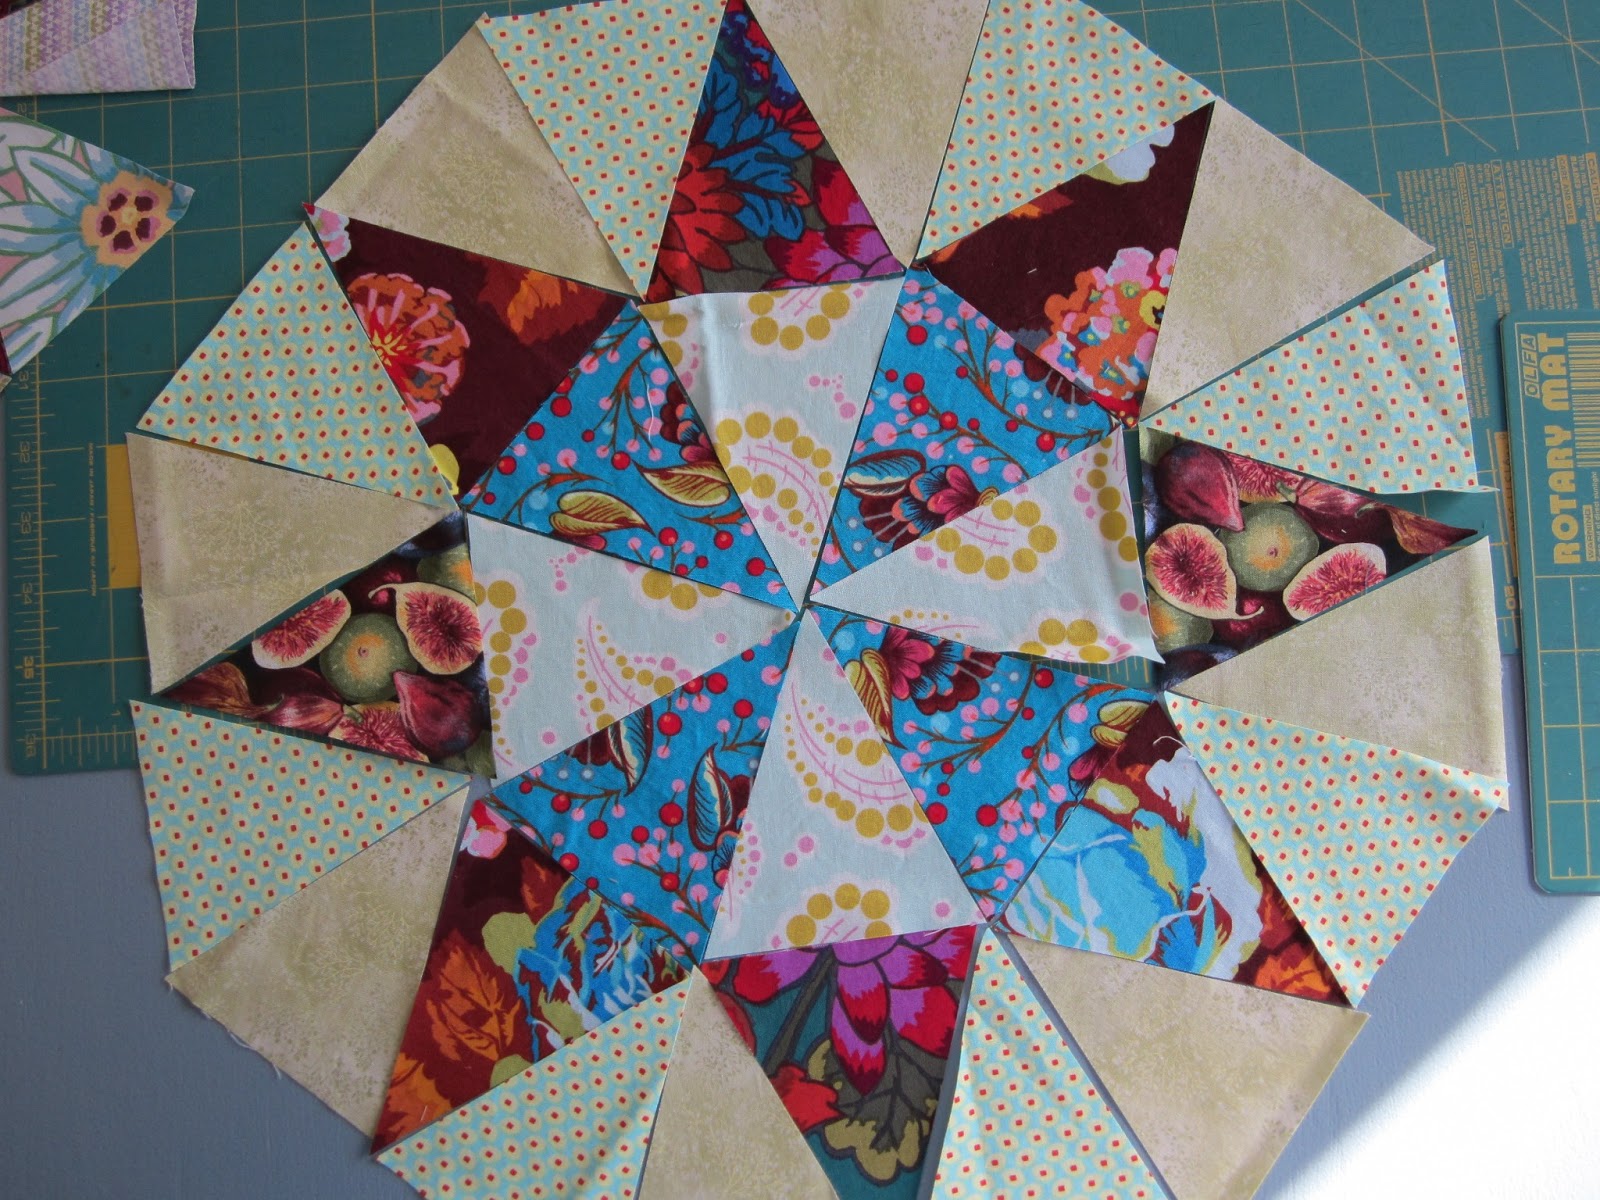
Triangles Galore (Victoria has a tutorial for them in her header). I loved making these blocks because I got to play with lots and lots of different fabrics, in combinations one might never expect to put together.
 |
| just a few of the Triangles Galore blocks I made.. |
Even though V. talks about using made fabric to make some of the small triangles in the block, I ended up NOT doing that (except for maybe four blocks). I decided the huge variety of fabric I used in making these blocks was enough busy-ness for the center. (By the way, I made all these blocks this past spring and they sat in the closet waiting for the next step, which I began over the recent holidays.)
I set 25 blocks (14.5 inches square each) on point. HMMMM. Now I needed made fabric for the corners.
And each corner measured about 51" x 51" with a diagonal of about 73". That took some doing.
Here's a photo stream of what ensued. Enjoy!
 |
| cleared living room. used sticks from the basement to get an idea of size and how much made fabric I needed. |
 |
| all four corners attached. Need trimming |
 |
| used lumber to check for a straight line and stuck pins along the inside edge of the lumber. |
Marking the line an old carpenter's trick.
 |
| preparing the chalk line - no chalk? no problem . I used baby powder! |
 |
| holding the string steady and tight |
 |
| snapped |
My helpers- this was a two person project.
 |
| John - alright... now what? |
 |
| Poppy - who herds us everywhere |
 |
| trimming |
VOILA!
 |
| this gives you a feel for the size |
 |
outside picture
|
One final note. With made fabric pieces going every which way, there are inevitably bias edges along the outside edge. To minimize stretching, I sewed rickrack along the edge edge. When I ran out of rickrack, I realized that I have strips of selvedge that I saved to tie packages, so I sewed that to the remaining edges. Sorry, I don't have a picture. These are temporary stabilizers until this baby is quilted and bound.... hmmm. Should I hand quilt this???? I'm tempted! I'm also a wee bit crazy!
I'd like to thank V I C T O R I A! None of this would have happened without her influences.


amazing how 'technical' quilters can be at times and what is used to achieve what we want. Hope you have good knees. Great quilt. Very impressed
ReplyDeletelove how you finished off the blocks with these setting triangles, really ties it all together and will look great on a bed.
ReplyDeleteoh yes start the hand quilting I bet it will be such a fun quilt to hand quilt.
kathie
It's gorgeous. Absolutely gorgeous.
ReplyDeleteOh, so successful! The made fabric for the large corners was a wonderful solution - it made the whole quilt top richer without taking away from the fabulous stars.
ReplyDeleteVery crafty using the snap line to trim your edges. Just some thoughts on your bias edges...you could add stay-stitching to help stabilize, my friend Wanda over at Exuberant Color always does this. Also, when binding, I often add a "flap" of a contrasting color between the binding and quilt top - adds color and also stabilizes the edge for a perfectly square quilt. Whatever you do, this quilt is a stunner!
ReplyDeleteThis is nan incredible quilt. Thanks for showing it off! Something like this may be just the thing for the boxes and boxes and boxes of scraps I have saved for the last 10 years!
ReplyDeleteI love how you did your chalk line. I will have to keep that technique in the back of my head. Again, your quilt is gorgeous. Thanks for sharing.
ReplyDeleteGorgeous! (Do you live in MN? I do!)
ReplyDeleteIt's so rich looking. Just like that oriental rug you laid it out on. GORGEOUS!!
ReplyDeleteI love your use of the darker, richer, denser colors in the made fabric corners ~ glorious!
ReplyDeleteCongrats on the finish of the top (and my DH would LOVE the use of the board and chalk line - he's an engineer).
Oh my, those triangle blocks are so big and beautiful, and all the different arrangements, I am so impressed! It has been so cold here lately all I have done is wear most of my clothes at once and finally finish a rather overdone baby quilt, but at least it is done. You obviously have some great help, especially your herder (I have cats, they are not in the least bit helpful in the sewing areas). I think i might attempt a few of those triangle blocks tomorrow, they just look so cheerful.
ReplyDeleteTohight I am folding laundry, hoping that will eventually get me sleepy enough to tip over, and I guess when i'm done with that I may go pick out some color for triangle challenge tomorrow. It is always such a treat to see what you are doing...Karin
This was no small effort, but clearly worth the fabulous results! SO beautiful. I may need to add this block to my "list." You need a white carpet.
ReplyDeleteHand quilting???!!!! With all those made fabric seams. You may indeed be nuts! Keep us posted. Happy New Year!
Oh, my, but that is one beautiful quilt! The "made" fabric really adds a neat dimension to it.
ReplyDeleteWow!! I love this quilt! Those triangle star blocks are beautiful, love your fabric combos! And then to see them set in your made fabric blocks is just so wonderful!! Thanks for the lumber trick for cutting strain lines too.
ReplyDeleteBeautiful, just beautiful! Thanks for sharing your process for true-ing up and cutting the edges.
ReplyDeleteThis is just stunning! I love the way the darker made-fabric sets off your stunning triangle star blocks! And the tutorial on how you get the edges straight is just brilliant! I'll have to remember that trick. Thanks! By the way, how big is this beauty?
ReplyDeleteAmazing. Amazing quilt! I love it and want to go make one straight away! ;)
ReplyDeletebrilliant!
ReplyDeleteWhat a stunning quilt! x
ReplyDelete